

Delight of Oreo Balls With Just 3 Ingredients
If you’re looking for a dessert that’s as easy to make as it is delicious, look no further than Oreo balls. These bite-sized wonders are a delightful combination of rich Oreo cookies, creamy cream cheese, and smooth chocolate coating.

Whether you’re preparing for a holiday gathering, a cookie swap, or simply craving something sweet, these no-bake treats are sure to impress. Best of all? They only require three ingredients and minimal effort, making them perfect for bakers of all skill levels.
Keep reading to discover how to whip up this crowd-pleasing dessert, along with tips, variations, and nutritional insights to satisfy both your taste buds and curiosity.
What Makes Oreo Balls So Special?
Oreo balls are more than just a dessert—they’re a celebration of simplicity and flavor. The crushed Oreos provide a satisfying crunch, while the cream cheese adds a velvety texture that binds everything together.
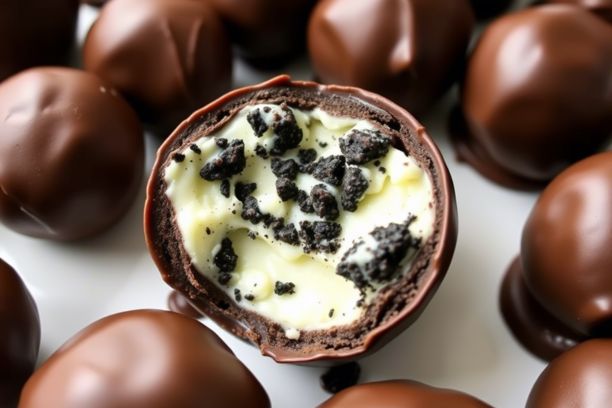
Dipped in melted chocolate, each ball becomes a decadent masterpiece that’s impossible to resist. Plus, they’re versatile! You can customize them with different Oreo flavors, chocolate coatings, and toppings to suit your mood or occasion.
Whether you’re serving them at a party or gifting them to loved ones, Oreo balls are guaranteed to steal the show.
Ingredients You’ll Need
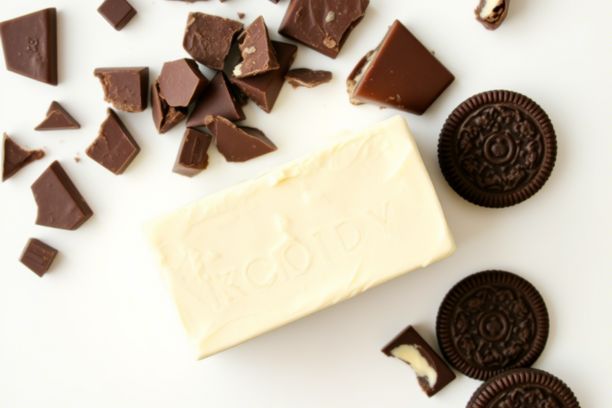
The beauty of Oreo balls lies in their simplicity. With just three key ingredients, you can create a dessert that feels luxurious without requiring hours in the kitchen. Here’s what you’ll need:
1. Oreo Cookies
For this recipe, you’ll need an entire package of regular Oreos—about 36 cookies. Don’t bother scraping out the filling; the whole cookie gets crushed into fine crumbs. If you’re feeling adventurous, experiment with flavored Oreos like Golden, Mint, or even limited-edition varieties.
2. Cream Cheese
The secret to binding the Oreo crumbs into a cohesive mixture is brick-style cream cheese. Avoid tub-style spreads, as they’re too thin and won’t hold the balls together properly. Make sure the cream cheese is softened for easier mixing.
3. Chocolate
Choose your favorite type of chocolate for dipping—semi-sweet, milk, or white chocolate all work beautifully. For a fun twist, mix and match different chocolates to create a variety of flavors and appearances.
Tips for Success and Creative Variations
- Experiment with Flavors: Swap regular Oreos for Golden, Mint, or Peanut Butter varieties. Pair them with complementary chocolates for unique combinations.
- Try Different Toppings: Beyond sprinkles and Oreo crumbs, consider crushed nuts, shredded coconut, or drizzles of contrasting chocolate.
- Use a Double Boiler: If microwaving isn’t your thing, melt the chocolate over a double boiler for precise control.

Step-by-Step Guide to Making Oreo Balls
Creating Oreo balls is a straightforward process that anyone can master. Follow these detailed steps to ensure success every time:
Step 1: Crush the Oreos
Using a food processor or blender, pulse the Oreos until they resemble fine crumbs. If you don’t have a food processor, place the cookies in a zip-top bag, cover it with a towel, and crush them with a rolling pin. Reserve about 2 tablespoons of crumbs for decorating later.
Step 2: Mix with Cream Cheese
Transfer the crushed Oreos to a large mixing bowl and add the softened cream cheese. Use a handheld mixer or a sturdy spoon to blend the ingredients until fully combined. The mixture should be sticky and hold together when pressed.
Step 3: Roll Into Balls
Scoop out tablespoon-sized portions of the mixture and roll them into smooth balls using your hands. Place the balls on a parchment-lined baking sheet. Aim for uniform sizes to ensure even coating during the dipping process.
Step 4: Freeze the Balls
Pop the baking sheet into the freezer for about 20 minutes. This step firms up the balls, making them easier to dip without falling apart.
Step 5: Melt the Chocolate
Microwave the chocolate in short bursts (20-30 seconds), stirring between intervals, until completely melted and smooth. For deeper coverage, use a small, deep bowl or liquid measuring cup for dipping.
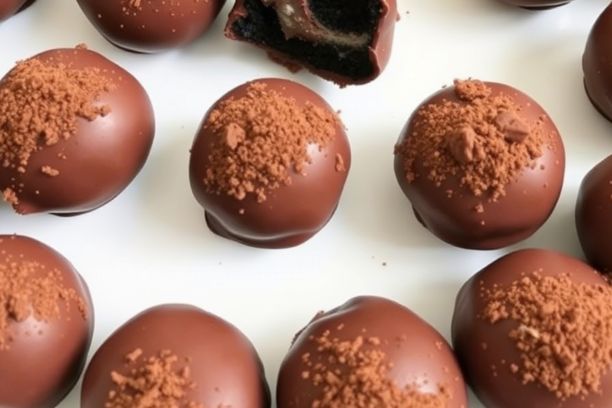
Step 6: Dip and Decorate
Using a fork, carefully lower each ball into the melted chocolate, ensuring it’s fully coated. Tap the fork gently against the edge of the bowl to remove excess chocolate, then place the dipped ball back on the baking sheet. Sprinkle with reserved Oreo crumbs or other toppings before the chocolate sets.
Step 7: Chill Again
Return the tray to the refrigerator for another 20 minutes to allow the chocolate to harden. Once set, your Oreo balls are ready to serve or store!
Why You’ll Love This Recipe
Oreo balls are the ultimate no-fuss dessert. They’re quick to assemble, endlessly customizable, and always a hit with friends and family.
Plus, their make-ahead nature makes them ideal for busy schedules. Whether you’re hosting a holiday party or simply treating yourself, these little bites of joy are sure to bring smiles all around.
So grab your ingredients, roll up your sleeves, and get ready to create a dessert that’s as fun to make as it is to eat. Your taste buds and your guests will thank you! I admire this recipe too.

Nutritional Information
Before diving into the recipe, let’s take a moment to understand what’s inside these tasty treats. While Oreo balls are undeniably indulgent, knowing their nutritional content can help you enjoy them mindfully. Here’s a breakdown per serving (1 ball):
| Nutrient | Amount |
|---|---|
| Calories | 90 kcal |
| Total Fat | 5g |
| Saturated Fat | 3g |
| Cholesterol | 5mg |
| Sodium | 45mg |
| Total Carbohydrates | 10g |
| Sugars | 8g |
| Protein | 1g |
Note: Nutritional values may vary depending on the type of chocolate and Oreos used.

Frequently Asked Questions About Oreo Balls
Here are answers to some common questions to help you perfect this recipe:
Can I Make Them Without a Food Processor?
Absolutely! While a food processor speeds things up, you can crush the Oreos by hand using a zip-top bag and a rolling pin. Just make sure the crumbs are fine enough for a smooth texture.
How Do I Store Oreo Balls?
Store them in an airtight container in the refrigerator for up to 5 days. For longer storage, freeze them for up to 3 months. Thaw frozen balls overnight in the fridge before serving.
Do They Need to Be Refrigerated?
Yes, because of the cream cheese, Oreo balls must be kept chilled. Leaving them at room temperature for too long can soften the chocolate and compromise the texture.


2 Comments